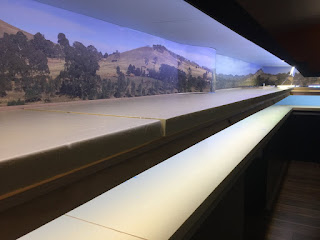
In the previous post we had managed to get one of the Haskell back
scenes in place, now the complete top level has back scenes the whole way
around, which equates to just under 20 metres worth. These back scenes are
extremely high quality and look brilliant once in place, but due to their
length of either just over or just under 3 metres each, installing them in
place is quite a tricky job.
I chose two different styles of back scenes, so as to give both sides of
the layout a slightly different feel. The scene behind what will be Gunnedah
yard is more of a hilly landscape, with the other side of the layout that will
be the location for the abattoir and coal siding which are on the outskirts of
Gunnedah is a much flatter landscape.
Obviously with two different styles of backdrop there could potentially
be an issue where they joined together, however the two scenes managed to join
together without clashing a great deal. Careful placement of some foreground
trees should almost completely mask the transition between the two scenes.
Due to the construction of the shed, both side walls have a protrusion
because of the framework behind them. We debated but the best way to deal with
this in regard to the back scene, but in the end the decision was made to curve
the back scene around the protrusions, which from most viewing angles very much
disguises them and keeps the back scene flowing as best as possible.
With the back scenes in place, it was time to tackle the LED lighting. When
I had decided to go with LED lighting, it all sounded pretty simple, by some
five meter LED strips with power supplies, install the strips in place, plug in
the power supplies and bingo, the layout is lit. The reality is somewhat more
complicated.
The LED strips that I have chosen, consist of a combination of warm
white, and RGB colour adjustable strips. Warm white strips give off quite a
yellow hue, and cool white gives off more of a blue hue, neither of which look
right. However, the combination of the two together very much cancel out either
undesirable trait. Using the RGB adjustable colour strip gives even further
adjustability in the lighting, being able to dim them slightly, and also being
able to dial in slightly different colours where you may be able to replicate
to a degree things like dusk or dawn, or even going a very blue shade which can
go a way to giving the impression of night-time.
The biggest factor with the LED lighting, is that each five meter strip
is rated as needing six amps, and whilst you can order of the strips with a six
amp power supply, a quick bit of mathematics throws up the following:
To go around the room is just under twenty metres, there are two levels,
and each level requires two different LED strips, which means sixteen five
meter LED strips are required, and thus that would require sixteen six amp
power supplies!
Adding to the complication, each RGB strip need a colour controller, and
the colour controller they come with can only handle six amps, which would
require the use of eight colour controllers. This was all beginning to sound a
little bit nutty, and quite frankly a lot more complicated than it first seemed.
After spending a considerable amount of time looking into the RGB thing,
I was eventually able to find some components that would make the installation
a little bit easier, or at least slightly simpler with less components.
In the end I settled on using four thirty amp power supplies, and
managed to find RGB colour controllers that could handle twenty-four amps,
meaning that I only needed two of these to control the eight RGB strips.
Doing it this way meant that we only need two power supplies and one RGB
controller on opposite sides of the room, much better than the sixteen power
supplies and eight RGB controllers initially needed.
In keeping everything as easy to use as possible, a simple switch box is
mounted underneath the bench work on two sides of the room, each has two
switches on it which turn on and off either the warm white or RGB strips for
half of the layout.
For the lower level, we mounted the LED strips on panels made from thin
plywood, that were attached to the timber strip that runs around the front edge
of the layout, using small 90° metal brackets, which we were then able to bend
outwards so that the LED lights would project down on an angle making sure that
the front edge of the lower level modules are lit properly.
For the top-level, the LED strips are mounted on a piece of triangular
shaped timber (similar to a piece of quad with a straight and not curved
section) so that they shine down at about a 45° angle. The combination of the
two LED strips gives a more than adequate amount of light, and really makes the
back scene come alive.
Standing in the room and looking around with the completed back scenes
in place and LED lighting 95% finished was quite a big moment in the build. The
basic layout looks good, but it now has a real sense of purpose, and if I may
say so myself, looks absolutely awesome.


No comments:
Post a Comment