Friday, December 31, 2010

Another Year Over, And A New One Just Begun.


I thought I'd finish off the year with one last post, and again a title with a musical quote from "War is Over" by John Lennon. Sadly it was thirty years ago on the 8th of December that John Lennon was assassinated, and whilst as a nine year old in 1980 I remember my parents being in quite some shock over the news, I don't think the man meant much to me back then.

Now being older and somewhat of a Beatles fan and more aware of what John Lennon was all about, the lyrics he wrote mean so much more, and although written in a different time when the world was a different place, they still remain as appropriate and meaningful as ever.

But hey, this is a train blog, who wants to read about long gone musicians?

Well I thought I'd make this last post for 2010 about the things outside of the hobby that sometimes take up that oh so valuable modelling time.

The first picture is where I figured I spent about 630 odd hours of my time this year, travelling between my home in Woy Woy on the New South Wales Central Coast to Central Railway Station on the lovely old Inter Urban V-Sets. These electric passenger sets were introduced in the 1970's, but they are far and above the most comfortable ride on the N.S.W. railways in my humble opinion. Air conditioned, sound proofed, and featuring lovely comfortable two either side seats these are a relatively relaxing way to travel.

The 5am morning trip from Woy Woy usually sees me back to sleep by Hawkesbury River station ten minutes away, and waking up somewhere between Redfern (one stop from Central) or as it pulls into Central if I'm lucky. The afternoon trip trip gives me a great period of time to do some reading and then depending on how brain straining the day has been often another sleep on the way home. Overall it's a cost effective, safe and stress free way to travel and I still, after just over five years of living up here and doing this trip, still love crossing the awesome Hawkesbury River Bridge.

The second pic is of of dogs. My wife and I always talked about getting a house and having a dog, and after finally getting our place just under a couple of years ago, a dog has turned into four dogs! Paws on the left was our first, followed by Gizmo (2nd from right), and then a little later Coco (2nd from left) and Bruce (far right) came along.

All of them are rescue dogs that we got from animal shelters or from people who save dogs from the pound and try to find a home for them. Coco and Bruce were saved from a breeder who'd kept them in small cages all their lives, and so they really didn't know how to interact with people. The lady who saved them was convinced that they would probably not recover mentally from this treatment and it would be better for them to be put to sleep. Well, to see their little faces light up when my daughter is around, and the way they follow her around like she's the only thing in the universe is a wonderful sight, and bit by bit they have become very happy little animals.

As well as the four dogs there are four Cockatiels, two fish tanks, a Pink and Grey Galah and six chooks that produce the loveliest fresh eggs each day! Once again they all take up a bit of time, but it's well worth it.

The third pic is another hobby that keeps time and finances stretched! This Mazda RX-4 was bought brand new in 1974 by my Grandfather, and was part of what got me into cars and these wonderful Rotary Powered Mazda's in my mid to late teenage years. Truth be known the car phase is what caused all of my trains to be packed away for twenty or so years!

I bought this car off my Grandfather about eleven years ago, and it's been sitting in his garage until earlier this year when I brought it home and have begun getting it going again. The engine is currently out of it awaiting stripping and then I'll decide whether to put that basically standard engine back in or build something a bit trickier for it. Once again there is some time and money needing to be spent but the car is pretty special to me so it's a labour of love. My Grandfather who turned ninety in September is looking forward to going for a cruise in it again as well.

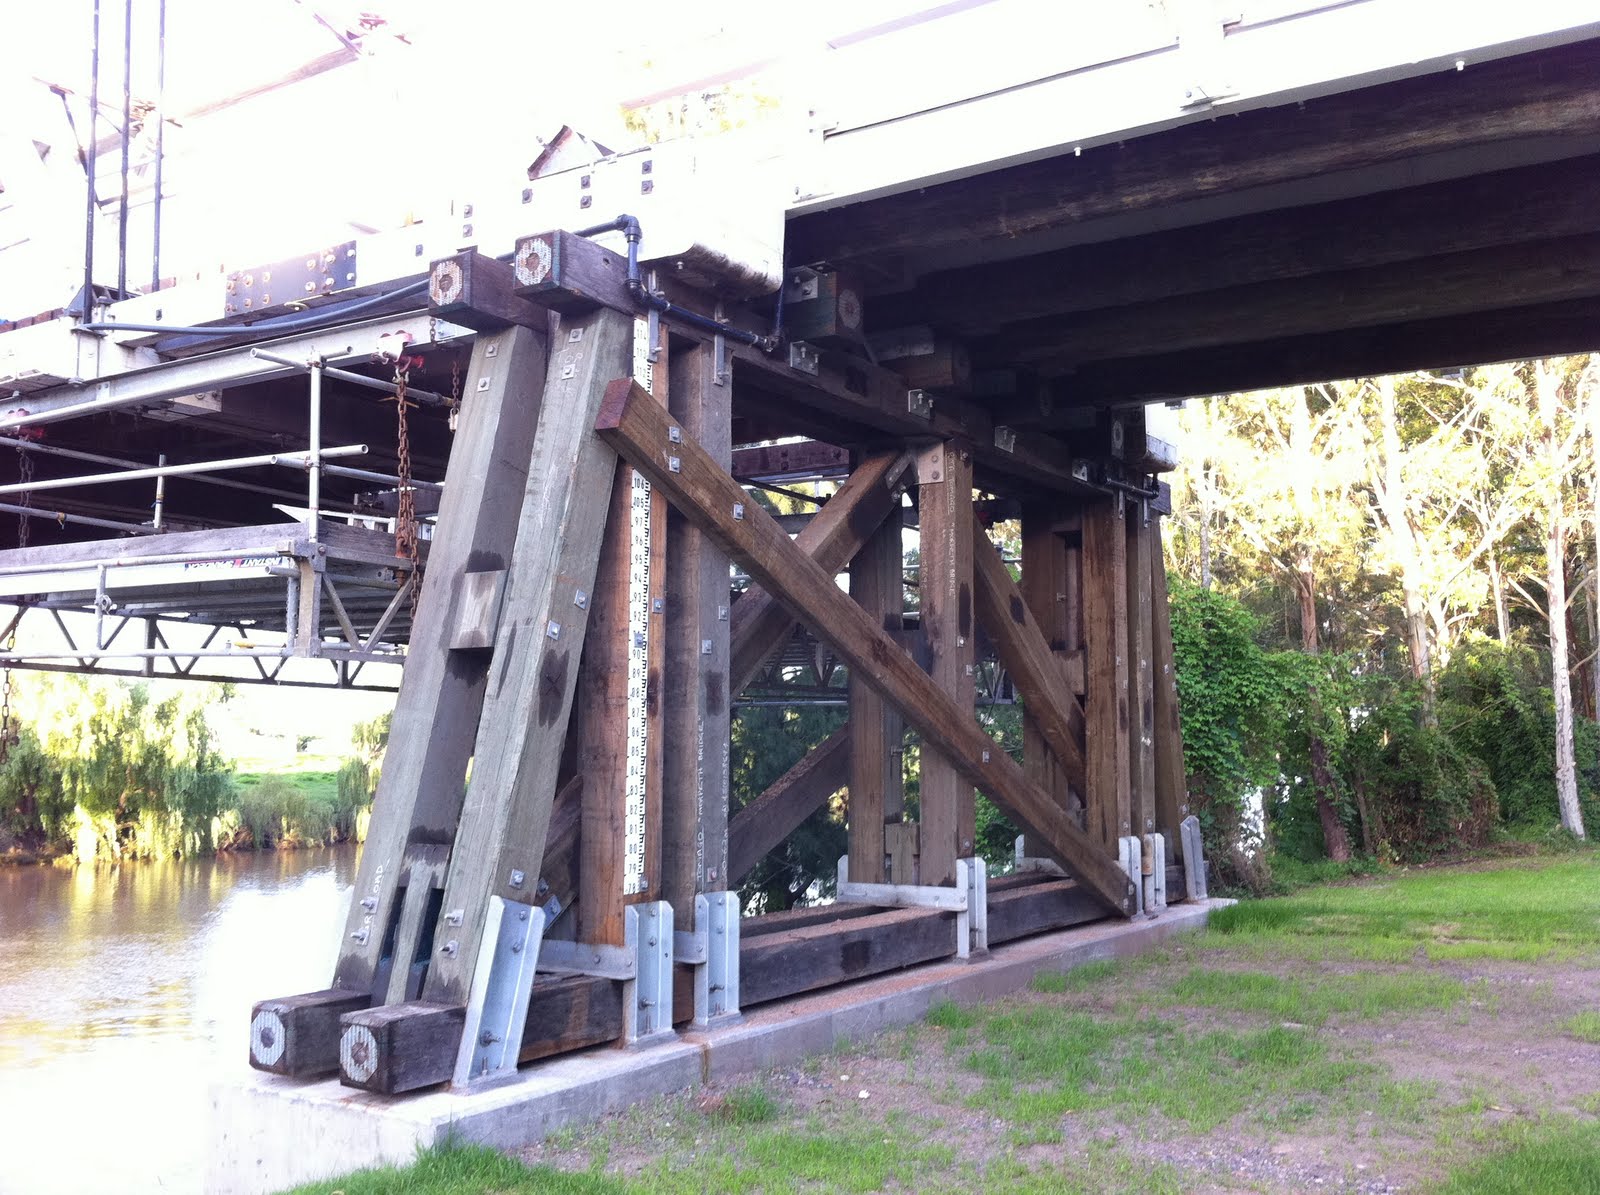
The last pics is of the aforemention Hawkesbury River Bridge, which takes the Main Northern Railway line across the Hawkesbury River. This pic was taken one Saturday when my wife and I took a long and leisurely cruise on the Lady Kendall that starts at Gosford around 10:30am, and takes in a cruise around Brisbane Waters, past Woy Woy, down past Ettalong and Umina, across past Lion Island and then up the Hawkesbury River, then doubles back and heads up through Pittwater before heading back past Palm Beach and across between the heads, through Brisbane Waters and back to Gosford, all of which takes about six and a half hours with morning tea, lunch and afternoon tea included.

The Lady Kendall is a
traditional timber cruiser which is the last of the mini liners that was purpose built for Reg Ansett's Ansett Airlines for their Hayman Island operation. The owner and Captain of the Lady Kendall tells a rather amusing story about the fact that they no longer build timber cruisers anymore due to costs, and that he likes timber boats, because timber floats and he can't swim. He then says that people ask "how can he be a caption of a boat and not be able to swim", to which he retorts "have you ever seen a pilot who can fly!"

The point of mentioning the river cruise is to point out that amongst our
travel too and from work and work in between, looking after our daughter and all the animals, general jobs around the house, domestic duties and even our hobbies, it's important to get away sometimes and just relax with your partner. Six and a half hours of cruising around the waterways with no distractions is a real nice way of doing that.

So getting back to the John Lennon song and the other lyrics "So This Is Christmas, And What Have You Done?", it's easy to look back and wonder why we haven't made as much progress with our modelling as we would have hoped, but when you look at the big picture and all of the other things that take time to do, it's a wonder we get as much done as we do sometimes!

So for now at 9:45pm on New Years Eve, I'd like to wish everyone a very Happy New Year, I hope that 2011 is full of health, happiness and well being, and hope that we can all fit in just a little more modelling time than we did in 2010!

Monday, December 27, 2010

John Allen's Gorre & Dephetid Railroad


During this post Christmas day period I've taken some time out to just have a relax basically. I do need to seriously get into the garage for a massive cleanup, but it's either been too hot, or like today drizzling with rain on and off all day.

I don't mind watching the cricket, but the Boxing day test has been less than interesting so far. Seeing Australia out for 98 (a good total would have been 350 odd!), and then not being able to take any wickets has seriously reduced my interest to the point where doing some cleaning in the spare room was more appealing!

However, whilst moving some things around I came across some train related books that needed to be put away. One of these was bought for me by my Grandfather when I was about twelve or thirteen, so circa 1984, titled Scenery for Model Railroads, written by Bill McLanahan.

Whilst typically American in layout and scenery style, it none the less had lots of very good techniques and common sense ideas that like most I soaked up, and probably read this book cover to cover dozens of times in those early years.

Whilst I knew even at that point that I wanted to model NSW prototype, I was awe struck by the centre spread on pages 52 and 53, which featured a colour image of John Allen's Gorre & Daphetid Railroad. To say that the layout dwarfed the HO scale trains was an understatement. Here was a scene where the trains were actually running through their environment in the most realistic balance of train to scenery ratio I had seen.

Being the good old days with no internet, I was only able to ever see a few other images of this magnificent layout, but from what I had read and seen I just new it was something special. So after flicking through this old book of mine once again, I quickly retreated to the Mac to do some searching to see what else I could find on this layout.

Track work was mostly code 70 rail, hand spiked to individually laid sleepers. Having done a small amount of this, it makes me realise what a job of epic proportions this must have been. Looking through some of the information, it appears that some of the scenes where almost completed before any track was even laid, much like the real thing!

The mountains which dwarf the actual trains extend from floor to ceiling in places, and although the scenery and structures are simply amazing, there are many tricks used to greatly enhance the viewing pleasure. Objects like trees and some structures were purposely built to smaller scales and placed towards the rear of the scenes, creating the illusion of greater depth, and even a mirror was used to increase the scene depth in one place. Lighting was extensive in line side structures, and lighting seems to be able to be tailored to suit different times of day.

None of the above is necessarily unique to this layout, but remember this was the 1950's and 60's, no doubt groundbreaking in its day and still impressive today no matter which way you look at it.

Being built during the 1950's, 60's and early 70's, photographic records are not as common as they are today. This coupled with the fact that in 1973 John Allen suffered a fatal heart attack, and only days later an unfortunate accident saw most of the layout destroyed in a fire, means that any records are almost forty years old at best. However there are a few web sites that have gathered a fair amount of information and pics.

This is a collection of images from the first stage of the Gorre & Daphetid Railroad through to the large masterpiece that eventuated. http://www.gdlines.com/GD_Galleries/Planning/index.html

This is a collection of pictures, articles, magazine excerpts etc of the Gorre & Dephetid Railroad. http://witt-family.com/gorre-and-daphetid/G&D_Files.htm

I know that this is kind of random to add a post about an old no longer existing layout of an overseas prototype, but for those of you with some time and an interest in truly spectacular modelling, I think you will enjoy having a bit of a look at the links provided.

Adendum: Funnily enough, while reading some other blogs I follow, I stumbled across a blog where someone is recreating the original
Gorre & Daphetid in Z Scale. It's quite an amazing feat and well worth having a look at.

http://ganddinz.blogspot.com/

Thursday, December 23, 2010

Merry Christmas Bloggers


Firstly, to all those who have followed my blog over time, I'd like to take those opportunity to wish you all a Merry Christmas and a safe and happy New Year.

Christmas often begins early in my house, partly due to my dear wife having great trouble keeping presents until the 25th of December. I'm not complaining mind you, it's just the way it is.

First cab off the rank was a copy of Greg Edwards Track Manual, I think I got that a month or so back. I had no idea it had been ordered, I guess my ramblings about things I "need" are listened too more than I realise sometimes.

I'd also mentioned that Toms Hobbies had some 44's on sale for $150 a while back, and sure enough it had made it no further than from the PO Box to home and I was given a box to open that "was" for Christmas.

Last night it was decided that because our daughter was so excited about Christams that maybe we could open a present each night to extend the joy. Last night's random pick was three pairs of socks, but having said that these are the Rolls Royce of socks, proudly made in Crookwell NSW, and are without a doubt the most comfortable and long lasting socks I've ever owned. Go to http://www.lindnersocks.com.au and have a look, you will not find better, and it's nice to support a 4th Generation rural Australian company to boot. Anyway I digress.

Tonight's random pick for a present netted me a lovely little Mortar and Pestle about 10cm in diameter. So I like to cook you may say, well not quite, and if you'd read a few posts ago about my adventures with dirt and gravel, it was mentioned in the comments that a Morter and Pestle would be great for grinding up into fine dust various parts of the earth. I may have mentioned in a subtle way my plans for one in a conversation with the wife, and once again, my hobby needs have been fulfilled.

There's still a few pressies under the tree, so I'm wondering whether those conversations about "all layouts need at least three Garratt's" and "you can't have a streamlined 38 without a non streamlined one to balance it out" were listened to as astutely!

Sunday, December 19, 2010

Going Around The Bend!


One of the things I enjoy about this hobby is not just the building and running of trains, but the little engineering challenges that go along with it.

I don't profess to be an expert when it comes to hand laying track, far from it. In fact I would consider myself a beginner in every aspect of it, and one of the things I have been struggling with is the area of laying a consistent radius curve.

I know of various tools one can use including the Tracksetta gauges, but it would seem to me that you are still trying to pull a basically straight length of rail around a curve that will be in tension and try to pull straight if it can.

Metal in general is a funny material and reacts differently when subject to heat and cold and other forces. A piece of code 55 rail is quite delicate, and yet has quite a resistance to being curved and maintaining that shape, and will pretty much spring back straight if given the chance.

Yet with some very subtle pressure, if you run it through a set of rollers it will form a curve and hold it without any trouble at all. I'm not sure of the technical reasons why this happens, but I know from using similar methods for bending much larger pieces of steel that it just does.

Armed with this, I figured it wouldn't be too hard to build a small scale rail bending apparatus. I had a look around for some small roller bearings, and came across some that I think are used in remote controlled helicopters, described as follows:

Esky Belt CP 000372 (EK1-0551) - Bearings 4x7x2.5

I believe EK1-0551 is the actual part number, and the the 4x7x2.5 relate to the size of the actual bearing, 4mm inside diameter, 7mm outside diameter and 2.5mm wide. I bought a set of four off ebay and paid $5.05 delivered.

I used a piece of 32x20x1.6mm aluminium angle cut in two 60mm lengths and clamped them together so they formed a "U" shape. I drilled two holes and slotted another hole to give adjustment to the position of the third bearing.

I found that a set of 8BA bolts (pretty sure they were but I bought them about 25 years ago!) had a head diameter that gave a neat tight fit inside the bearings which was handy. I then drilled the holes in the top piece of aluminium larger than the bottom piece so that I could use an 8BA nut that would allow me to adjust the bearing height, and then another 8BA nut under the bottom
piece of aluminium to secure the bearings in place.

The slot for the bottom bearing allows a different amount of tension to be put on the rail to give a very subtle or quite dramatic bend in the rail. With a bit of pressure the rail will bend into a 10cm radius and hold it perfectly!

You must push the rail through the bearings to have the best effect as well. Drawing it through in a pulling motion tends to give a less consistent result as pulling the rail past the last bearing at any angle bar straight changes the tension on the rail and the curve.

The prototype is rough and ready, and is not easily adjusted for tension, however it proves the general theory and the suitability of the bearings I chose, and I can now design and build something a bit more flash.

Ideally the two static bearings could be a little further apart, but the big gain will come in the easy adjustability of the third bearing that determines the degree of curvature.

I have another use for these bearings as well but that will be for another time once I've had time to experiment.

Saturday, December 18, 2010

Basking in the Afternoon Sun


I don't really have anything of interest to write about, but thought I'd chuck up a couple of test pics taken on the test module with a couple of bits of rolling stock. I seriously need to get some kind of backdrop printed off for these makeshift pics until the whole thing is finished.

The combination of the two different styles of fluro globes in the old floor lamp I use when lighting the module in low light seem to give a bit of a golden glow not unlike the effect you get with the setting sun, which is quite a nice effect I think.

Somewhere down the track a decent camera will have to appear, as I'm not happy with my sub standard image quality compared to some of the other bloggers!

Wednesday, December 15, 2010

Bristling with Ideas!


I don't think I'm alone in saying this (I hope I'm not alone anyway!), but no matter what I'm doing during day to day life, there is always a part of the brain analyzing things and saying "how can I apply that to my trains".

Whilst rummaging through some stuff whilst cleaning up in the car port, I came across some paint trays and a brush that I used to paint the train ...... umm, I mean spare room about 13 months ago. I don't know about anyone else but those "wash out in water" paints just don't work for me. No amount of rinsing seems to fully clean the brushes, but in any case they aren't expensive these days, and I figured it was still ok for less than perfect jobs. Waste not want not I say.

The colour I painted the room was called Happy Days, a bright yellow ochre of sorts which was bright and cheery, and yet the remnants left on the bristles of the brush were a faded washed out dull yellow brown colour. About here was where the "train brain" kicked in and said "pssssst, that looks awfully like the tufts of faded grass you often see line side and in sun drenched paddocks and fields.

So armed with a pair of scissors, I decided to cut some random lengths off the ends of the bristles, gather into small bunches, and insert into some small holes in the test module. A dab of PVA glue, and 24 hours later I think I have a fair representation of the said dried grass.

It looks slightly coarser in the photos than by the naked eye, but overall I'm pretty happy with the result. Judging by the amount of material I have from cutting off only a cm or so off the brush, I should have a fair supply of this stuff to use on the layout.

So once again my practice of not throwing anything out (which unfortunately also means the garage is still no closer to being empty enough to begin on Gunnedah) has once again paid off. It also shows that with a bit of lateral thinking it's surprising how many items just laying about can be put to use on your layout.

Tuesday, December 14, 2010

Old Timber Bridges


It isn't strictly railway related, but who doesn't love old bridges (and I'm not talking about Lloyd or Jeff)?

Christmas time generally sees the usual visits to relations places for various gatherings where you catch up with people you tend to only see once a year, sometimes by choice!

One of these gatherings takes my family to the very old town of Morpeth in the Hunter district of NSW. This area is widely known for the vast amounts of rail coal traffic emanating from the surrounding areas if you are into trains, and also famous for its wine districts if you like the odd sip.

Morpeth no longer has its rail line, but it has a wonderful old road bridge which spans the Hunter River that is some 280 metres long and was built in 1898 or there abouts. Morpeth bridge is the oldest remaining example of an Overhead Braced Allan Truss Road Bridge in service, and one of only three left in NSW apparently. The bridge has been undergoing some well needed maintenance work for a while, and the deck timbers are all currently being replaced.

I drove over this bridge a couple of years ago and to say she was a little creaky was an understatement. I'm amazed to hear long time locals calling for it to be pulled down and replaced, seeing as how Morpeth is one of the areas strictest heritage sites.

In any case, I thought I'd throw up a few of the pics I took as the late afternoon sun was setting. I wish I'd had a better camera with me, but the old iPhone does ok when these photo opportunities present themselves unexpectedly.

Sunday, December 12, 2010

More of the Real Thing


After my last post where I mentioned some nice rich red dirt I noticed next to a road about ten minutes from home, I had this great idea, go and get some instead of thinking about it.

It was located on what looks like the beginning of a 4WD track of sorts, and the ground was quite compacted and hard to actually get any fine dust from. After chipping away with a small hand spade and having a mere handful I stood up and looked around to see if there was any softer stuff around.

As it turned out closer to the tar road there was a a bit of a side passage which was more of a clay than a compacted dirt, and it came away in chunks that I figured would quite easily break down into a finer dust. I 85% filled a plastic dog biscuit container (about a litre in capacity or so I guess) with the clay as well as some really red small rocks and some lighter dirt and headed home.

Once home I was trying to figure out how to turn this mixture into a fine powder and then apply it to my little test module. The I figured with the hard stones in there with the clay chunks, if I gave it a decent shake the rocks will break down the clay and then all I need to do is separate the fine dust from the larger bits.

The shaking vigorously worked a treat, with a fair amount of dusty power being produced. I then had an idea that if I could strain the mix through a stocking or similar I should be able to get the fine stuff I wanted. Luckily my wife is usually sympathetic to me needs, and suggested a nylon sockette (basically like a stocking material that only covers the bottom half of the foot) might do the job. So after borrowing one (yeah like it's going on a foot again!) and stretching it over the container top, I could apply it directly by simply shaking the container above the area I wanted covered.

After sprinkling a quantity onto the are, I used a mixture of
Pascoe’s Long Life floor polish and Isocol rubbing alcohol sprayed from a plastic spray bottle to stuck it down.

Depending on how much spray I used, the dirt ended up light or slightly darker than in it's dry form, but this gives a bit of variation which I don't mind. It was still damp in sections when the pictured were taken so I expect it may lighten some more yet. The pictures were taken outside in natural light at about 5:30pm Sydney time.

Overall I'm pretty happy with the texture and basic colour, and I'm planning on collecting some more material in slightly varying colours to help with the random effect that occurs naturally.

Ooh ma-ma mow-mow, I am the real ...... thing!


There are some things that I find I am able to replicate in model form with reasonable success, those that with a slightly squinted eye, pose a passable representation of the real thing. Trees however, are not one of them.

I have tried various methods over the years, some methods tried and proven by others, some of my own ideas, but in the end they always look like something created by someone with very little talent for making trees. I don't know if it's the texture, the colour, or the random shapes that real trees take on, but as far as modelling goes I haven't seen too may people who truly get it right.

The thing is, just like track and ballast, and dirt and grass, effective trees can really enhance the look of a scene, and sometimes just one or two really stunning trees can have an amazing effect on the overall "look".

So getting back to the topic of what to do if you can't make trees to save yourself? Have a good look around your neighbourhood and see what trees are around, and more to the point have a good look on the ground around them.

Nature seems to have this amazing ability of producing miniature versions of full sized trees. Each branch that stems from the trunk shrinks in size and yet seems to maintain most of the proportions until you get to the truly tiny bits right on the end.

I've got two trees in my back yard, that produce totally different twigs, and yet both are in their own way very passable representations of scale trees. One tree is a type of Christmas Bush and produces quite fine twigs, with the part that would form the trunk of the scale tree being around 2.5mm in width, or around 9" in scale diameter. These particular twigs have lots of fine branches coming off them and will suit smaller trees quite well.

The twig I have photographed which is off the tree down the back that flowers in summer with a bright purple foliage (sorry I have no idea what its botanical name is), has about a 6mm trunk, which in scale terms is a little bit less than two feet across, which is a good size for an average gum tree or similar. These twigs have fewer branches coming off them, although I have some with four or five main branches, and so would be better for sparser looking trees, or parts there of laying about representing fallen trees.

The colour and texture of this one in particular is very pleasing to the eye, with a washed out greyish brown colour, and some very small knots that look particularly good.

When it comes time to add foliage I'll look at the Heiki/Woodland Sceneics etc range to try to find something that is fairly dull in colour, unlike the typical European trees which tend to be far greener than ours.

Don't pay too much attention the the ground cover by the tracks, I'm in the process of tying out a few different ideas, some of which have worked, and some have been a total failure. Speaking of soil colouring I saw some nice rich red/brown dirt not far from home which I might go and grab a bucket full off and see how it goes. Once again though it would seem that the things that look most like the real things, ARE the real things!

Sunday, November 28, 2010

Keeping It On Track


Whilst on the topic of track I thought I'd do a quick spot of weathering and ballasting of some Peco code 75 flex track as a comparison to the hand laid NSWGR branch line track I did recently.

I've got a few lengths of timber that are around 40mm wide by 30mm high that I have some Peco code 75 flex track attached to. I use these to display some of my steam loco's on and they are typically cut so they are about 20mm longer than the loco sitting on them.

So taking one of these bits aside I had a stab at making the Peco track look as close to the typical NSW track and sleeper colouring you find in the more western areas where the sleepers are a dull'ish browny grey colour and the rails are a sort of dusty rust colour.

I used the same basic technique as detailed previously, firstly giving the sleepers and rail a light coating of Killrust etch primer from a spray can. This gives a good grey base colour to the sleepers and gives the clear orange Tamiya paint I use for the rust something to key to.

I then used a diluted wash of the Tamiya Flat Earth and Flat Blackand brushed it across the sleepers, building up the colour slowly. Isocol alcohol works really well for diluting the paint and basically evaporates so you don't get a thick buildup of paint which can hide the grain detain in the sleepers.

Once dry I then use my mix of 20+ year old slightly solidified Tamiya Clear Orange with a bit of Isocol mixed in, and brushed it along the sides of the rail. The diluted mix is very runny and spreads very easily along the rails. Once again I don't worry about a little bit of it running onto the replicated steel plates that the rail sits on as these have a rusty appearance on the real thing. I found two coats of the clear orange gave just enough tint without it being too obtrusive. Ballast used is what I usually refer to as a river bed mix which is found in a lot of country areas.

Overall I was quite happy with how the flex track turned out. For modelling a main line the Peco code 75 and closer spaced sleepers look reasonably good, and unless you run a vernier over the sleepers their different size to the real NSW ones are not really that noticeable.I guess it's another case of being not quite right under the magnifying glass, but at typical viewing distance it probably would do the job nicely.

Looking at the two types of track together though, the finer rail height and rail head width of the code 55 along with the wider spaced, slightly crooked and less uniform placement looks very different to the flex track and in my opinion justifies the extra effort in laying it especially for a smaller branch line style layout.

Monday, November 22, 2010

Adding a Spot of Ballast

.


Nice and quick tonight's update.

Basically went through some scenery supplies and found a river bed ballast looking mixture, and ballasted a short section of track just to see if the colour and consistency are what I'm looking for.

Using the typical watered down PVA method the ballast darkens on application, but seems to lighten over time. It will be interesting to see if it continues to lighten up over night as it dries thoroughly.

I always find it helpful to place a piece of rolling stock on the track or within the scenery as it gives a sense of scale to the whole thing, as sometimes what the eye perceives as being right is not so.

Sunday, November 21, 2010

Tinting, Staining, Rust and Relics


Well, unlike most weekends where they seem to fly by and before I know it it's Sunday night and I have little to show for it, this weekend's been a bit different.

Today started with taking the section of track with only the PCB sleepers attached down to the garage, and hit with a light'ish coat of the good old Kill Rust etch primer. I didn't want too much on there as the code 55 rail is very fine, and it would be easy to glug up with paint.

Basically I wanted just enough etch primer on the rail to give the the paint used to replicate rust to have something to key too, as well as giving the PCB sleepers a base grey colour to work with rather than the copper colour which doesn't look like anything we see in real life.

Once the etch primer was dry it was time to try to replicate the balsa sleeper colour on the PCB sleepers and then give the rails a rusty look. Again I broke out the Tamiya XF-1 Flat Black, XF-52 Flat Earth and used a little of each on the tip of the brush, diluted with some Isocol Rubbing Alcohol. I have a little stainless steel tray which I put some of the alcohol in and then add the paint to it, mixing it around as necessary to get the right consistency and colour. I find it easier to build the colours gradually than do it all in one go, which seems to work for me.

It's hard to get the PCB sleepers to the same colour as the balsa wood ones, but a small variation does not matter as it gives that little bit of random variety. Having a diluted mix of colour also leaves some of the grey etch primer showing through so basically it's a matter of balancing the added colours to get the target shade I'm after.

Now comes the rust effect on the rails. I'm sure there's as many methods for doing this as there are people who do it, and you can buy paints like rust and rail brown which seem to do the job nicely for others. The only thing I sometimes notice is that the rust effect is sometimes too harsh, or too solid, and just looks a bit too heavy. It's hard to pinpoint, but the look I was aiming for is rusty, as well as dusty, that kind of light grey'ish dull finish with a light coating of rust.

I'm probably no different most who have been in a hobby for a long time, and even though I wasn't actively modelling for around twenty years, I still had packed away with my old trains all of my various paints and tools, bits and pieces. Amongst this lot was some Tamiya orange tinter that I used to use to give clear lenses an orange tint to replicate blinkers lenses on model cars. It's code is X-26 and it typically is a thin'ish mix with a slight tacky finish from memory. I say from memory because I would have bought this bottle when I was about eleven or twelve, so we are talking about twenty seven years ago!

Now to digress for a bit, I have used this bottle recently to see how it would go replicating rusty stains on an old Trax MRC I built when I was around fourteen years old, once again a looooong time ago. When I initially opened the bottle of orange tinter, it was no longer a thin consistency, but rather a solid mass that didn't seem to work too well with a brush poked into it. Hmmmmm, it would be a waste to throw it away, so I thought I'd add some of the wonder stuff, a dash of the Isocol alcohol.

So armed with a piece of old rail I began to give it a stir and see if it would thin up a bit. It didn't, instead making a sticky almost rubbery mixture, but amongst the still semi solid mass, was now a dilute mix of orange tint, slughtly this, but quite full of colour no less. I added more alcohol and shook the bottle furiously, but it does not seem to be able to break down the semi solid mass, however, there is plenty of colour than I can still soak up with a brush.

Starting with this odd mixture and then mixed again with a little black and earth colour, I built up a stain and applied it to the MRC with lots of alcohol added to make it a wash. I'm not completely happy with the finish, but it's not too bad in all honesty, and certainly better than the stark white that it used to be as seen here https://blogger.googleusercontent.com/img/b/R29vZ2xl/AVvXsEihGM9lEIRdmDW9H-eqG8t7GjB9jk4l2K-ebkG34b9Rr_sj6dlKmjsYVt1HmTCwTw8QlQqMW4IDfSkeiaGTkdz2xyjJfnuHITbCWEJz60zsAGtkDSHPz_XZWIzD4KdCWAr_IV_-6eVk5rQ/s1600/DSC03982.JPG

In any case, getting back on track (yes a bad pun), I wondered how this orange tinter mix would work as rust on the rail. With the grey etch already in place, I once again dipped the brush in the mixture and then externally thinned it down a little more with more alcohol, and applied it to the rail sides. Being very thin it ran easily along the sides of the rail, so I could load the brush up and just drag it across the base of the rail and it would pretty much run into place. I needed a couple of coats to get the right amount of colour needed, but over all I am very happy with the result.

It has a certain semi metallic finish to it which I like, and has keyed well to the etch primer. With a dilute mixture I also dragged the brush across the sleepers where the rail would sit, as I have noticed that the rust on the rails bleeds into the sleepers on the real thing. Once dry, I then stuck the rail down over the balsa sleepers with some PVA glue placed where the PCB sleepers would sit, and a weight was placed on the rails while they set.

I've taken a few pics both inside and outside, and I have to say that for an initial attempt I am well pleased with the result. It's quite amazing how different things look in natural light as well, but ultimately you really have to aim for what looks right under the lighting your layout will be under.

Using the very basic maths on one yard of track taking me about a weekends worth of work, laying the twenty five to thirty odd yards of track the layout will need (plus points) should keep me busy for a while!

Saturday, November 20, 2010

Sidetracked, Soldering, Sleepers and Staining


For quite some time I've been meaning to build a small diorama for photographing pieces of rolling stock and locomotive's on, and thought now would be as good a time as ever to do it.

Even though the main aim at the moment is to get the shelf layout underway, building a small diorama would give me a chance to try out a few ideas and techniques that I want to use and see if they work as good in practice as in theory. So whilst this is a bit of a side track, it gives me a chance to practice some soldering again and get something finished for a change!

So armed with a piece of 900x300mm ply, some cork strips cut from 300x300 cork tiles bought from Bunnings, some masking tape, PVA glue, balsa wood and pcb sleepers and some code 55 rail I got to work.

Instead of cutting the cork to roughly sleeper width, I cut thinner strips only around 8mm wide which are then placed to line up with the outer edge of the sleepers, leaving a gap in between the two strips. The ideas behind this are basically these. It uses less cork so saves money, thinner strips are easier to form into curves, the space in the middle will be used to run the droppers from the rail to the main bus wires, as well leaving room for the piano wire that will go down to the two position switches that also switch frog polarity.

So that all sounds great in theory, but what about the trench left in the middle when it comes to laying the ballast. Well, I also wondered if I used masking tape across the top and then used it to form a gradual taper on the outsides of the cork to help form the ballast shoulder. This in theory will mean I should need less ballast, and be able to have a fairly consistent shape to the shoulder, with some variation purposely used for effect.

I used a small amount of PVA glue to stick the cork to the plywood, and with a piece of weighty laminated wood laid over the top after positioning the cork it was allowed to dry for about an hour.

Whilst this was setting I got to soldering the PCB sleepers to the code 55 rail, using one PCB sleep in every sixth position. On the straight track I think the PCB sleepers may only need to be used for every seventh or eighth sleeper as the rail is not really likely to go out of gauge in such a short distance, especially as it will also be stuck to the balsa sleepers as well.

I soldered one rail in completion to the PCB sleepers before adding the second rail, and am wondering if when laying curved track this may be an interesting technique. If I solder one rail first, then lay it in situ curved on the cork in place like a piece of flex track, I can then add the second rail in position. Once again we'll see how this goes in practice a little later on.

Once the cork had well and truly stuck to the plywood I stuck the masking tape down over the top in two strips, forming a nice gentle shoulder on each side. I have no idea of masking tape degrades over time, but I figure once coated with a PVA mix and ballast, even if it does the ballast should be a hard formation and not collapse anyway!

I've already cut a fair amount of balsa sleepers in a little jig I made which at least makes this job a bit faster and a little less tedious. I'd soldered the PCB sleepers based on using 2' 6" sleeper spacings, so it was simply a matter of laying the track in position and marking where the PCB sleepers fell, and then using a scale rule marking the appropriate positions for the balsa sleepers to go in between. When positioning the balsa sleepers I wasn't too critical to get them exactly square and evenly spaced. Branch line track seemed to be a little less accurate and this slight wobbliness adds to the overall effect anyway. A small smear of PVA glue was run along and the sleepers stuck in place.

Once set in place, the sleepers where given a light cote of Kill Rust etch primer which comes in a pressure pack spray can. Sleepers seem to get a bleached grey colour over time, and this was a quick way to get an overall base colour without having to individually colour each sleeper.

Once dry, I got a bottle of Tamiya Flat Black and Flat Earth, and diluted with some Isocol rubbing alcohol, used a wide'ish brush and gradually built up a little contrasting colour, trying not to add too much. The beauty of the diluted mix is that you can very slowly build up the colour, as it is very easy to add too much using straight paint.

Even taking my time, I think I may have gotten a little too much brown into the sleepers, although up close and in some pics I took they do look quite good. Once I add some ballast and paint the rails I'll have a better idea of how they looking the setting.

The rail is yet to be attached to the sleepers, as I want to paint it and have the PCB sleepers basically textured before I stick it down for good.

It's probably a bit hard to tell from my average quality images, but I think overall I'm much happier with the look than what I have previously been able to achieve using flex track. And whilst the hand laying method is slower, it does give a much better representation of a light branch line which is what I want to model.

Friday, November 12, 2010

Keeping It All In Proportion: Adendum


Going back a couple of posts where I lamented about my non acceptance of the size relationships of HO scale trains vs cars and trucks, it was interesting to receive a few comments from people who had a similar impression. If nothing else it was nice to know I was not alone in having this idea.

Anyway, I was going through a folder full of images I have found online and came across one that was very very interesting. Basically it was an old International or Dodge truck, a very very common model in Australia in the 60's and 70's, and being quite familiar with this model and its size, it kind of put a few things in perspective.

Firstly looking at the picture, I get that same impression of the truck being too small relative to the S wagon. If I was doing a version of a police identikit picture, and was asked to increase or decrease the size of the truck until it was in proportion with the S wagon, I would probably make it a bit bigger than it is. Basically my idea of sizes between these two things is disproportionate.

But, having a think about what I had laying about in the spare room, this gave me a chance to have a play as well on a Friday night where there was not a lot on t.v. to keep me remotely interested.

Now the truck I have used is not a Dodge, and is not strictly HO scale, but most probably 1:76 being an old Matchbox model, it is none the less in relative terms "similar" if not slightly bigger than it should be.

Placed with a Road Ragers Holden it looks about right in relation to size, and my brain doesn't have a problem with them co-existing together.

So, armed with an S wagon I have had for about twenty five years(and it looks it), a GLX of similar vintage, a flat bed truck and an old Holden, I've recreated the scene in what you would have to agree is a very fine representation, and an example of my substantial modeling skills!

Interestingly the relationship between the truck and the S wagon is similar to the real thing, and the car looks in proportion to them both and in relation to the GLX from this particular angle. The photo of the actual scene also makes my brain realise that even small four wheel wagons like an S wagon, would swallow a small to medium sized truck like the old Dodge quite easily, which is not what I think possible when looking at a lone S wagon.

I think the key to all of this is that we may not realise just how big even small pieces of rolling stock are, not to mention locomotives. After looking at some pics of the old 35 Class working the rails in days gone by, they are also not a small loco. I think we forget that they share the same sized drivers as a 38 Class, and pictured double heading with Garratt's shows them to be quite a sizable loco in all dimensions bar overall length.

Sunday, November 7, 2010

Too Much Planning, Not Enough Doing!


If there is one thing I am relatively good at, it is planning and scoping out a project. I'm not one to rush into things without giving them careful consideration, and try to make sure I have a reasonable plan and idea of the finished product before I begin. The down side of this, is that I can tend to spend way too much time planning and not actually get started!

The base boards for the spare room shelf layout are a classic example. About twelve months ago I started construction of the module framing that would make up the base for the track to go on top of. I had it all planned out in my mind, but each time I went to go a bit further, I just wasn't totally happy with the method. So for months and months I have been looking at various ways to get around the problem, until I finally realised that the way I thought would work just wasn't the best way to do it.

So this weekend, armed with a few bits of ply and some pieces of the framing timber I already have, I started cutting and screwing bits together, and before I knew it I had two parts basically done, sitting on the wall brackets ready for final adjustments and a method to securely attach them together so they are perfectly lined up.

These modules are on the long wall of the spare room which is about 3.94 metres long, and these two modules make up 3.08 metres of that length. The end module which is 1.28 metres long is an odd shape, basically to make sure I can use every single bit of room I have.

From the initial design of this layout where the base was only about 12cm wide, it's crept out to around 30cm wide, partly because a 30cm deep book case now resides below it on this wall, so I figured why not take up that same area above it?

The result being that this end module starts at the 30cm width, but tapers all the way down to 6cm where the layout ends behind the door. This allows the door to open most of the way and basically rests against the layout edge, and gives me that vital extra room on what is by most standards a reasonably small layout.

I'm not exactly sure what will go down this end, but it will basically be the end of the runaround, where brake vans can be shunted ready for the train to reverse direction and head back from where it came.

The pictures show the boards, and a short train made up of five four wheel wagons, a BWH and an MHG. This represents about 600mm in length, which will be a fairly typical length train I think. This should allow me to fit in a main line, a loop line and a couple of sidings. Basically operation will revolve around a mixed train coming in, wagons being spotted into various sidings, a new train made up and sent back around the room.

It's actually quite amazing how much enthusiasm you can get from having a base board, and placing a few random bits of track and rolling stock on it. Add a cardboard cylinder and suddenly you have a silo, and then the "imagineering" kicks in and you begin to see what will be there, not just some bits of pine and ply!

So if there is a point to this thread, it may well be try a little less planning, and get into it.